Forget everything you thought you knew about baking intricate pies. If the mere mention of lattice tops, crimped edges, and the dreaded "soggy bottom" sends shivers down your spine, then prepare to meet your new favorite dessert. The apple galette is here to revolutionize your dessert game, offering all the comforting flavors of a classic apple pie with none of the fuss. This isn't just an easy recipe; it's a celebration of rustic charm and effortless elegance, perfect for both novice bakers and seasoned pros looking for a quick, impressive treat.
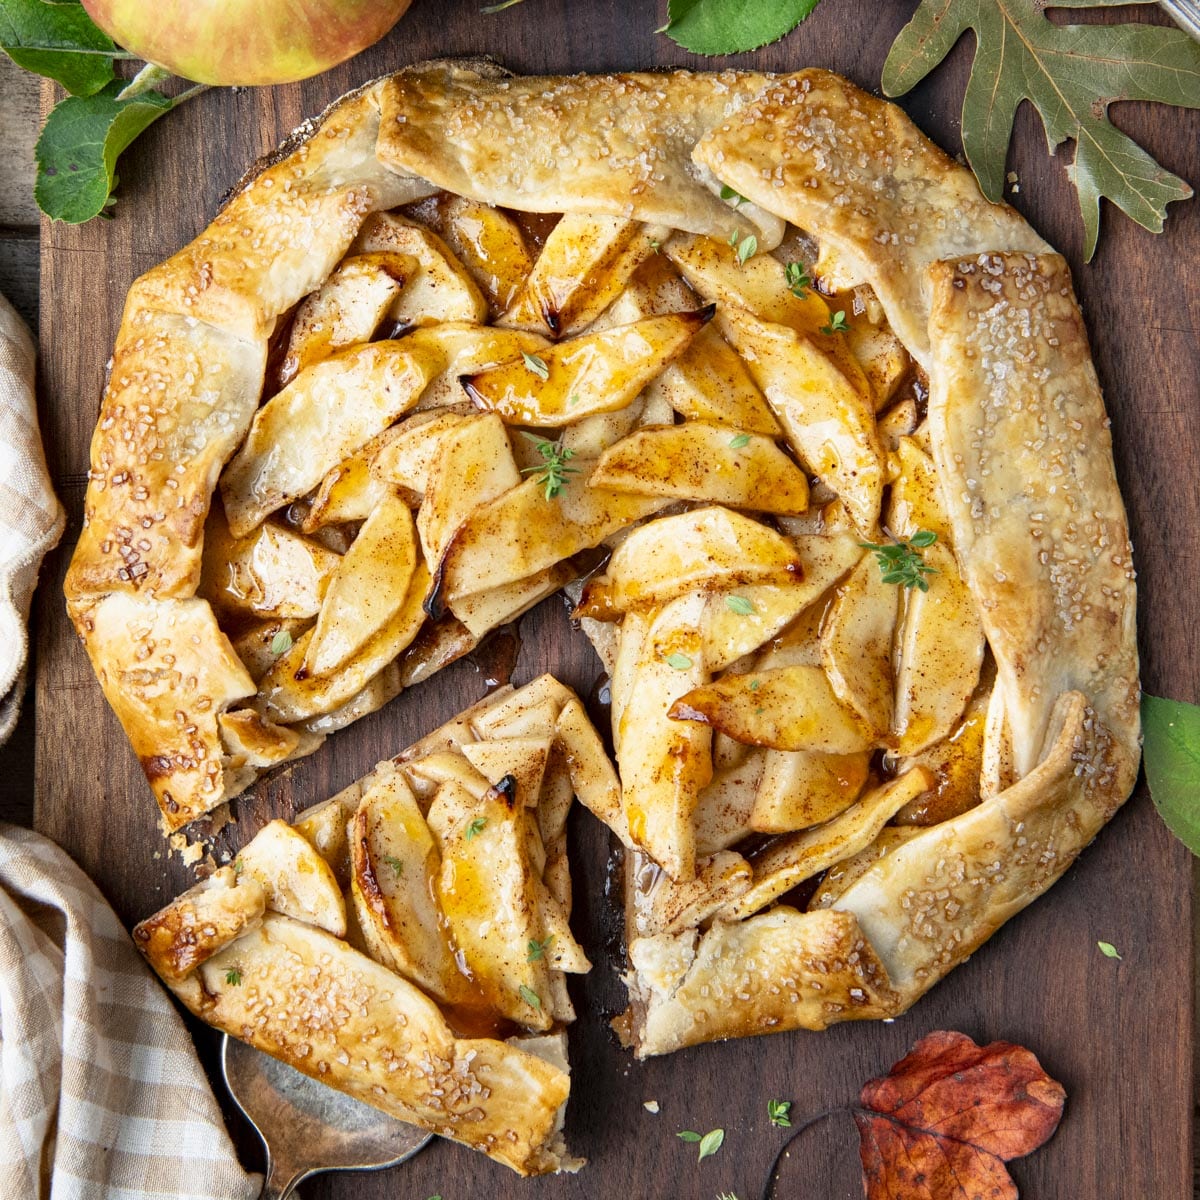
Imagine a buttery, flaky crust embracing a luscious mound of perfectly spiced apples, all baked to golden perfection right on a simple baking sheet. That's the magic of an apple galette. With no pie pan required and minimal prep, you'll be enjoying this delightful dessert in no time. It's the ideal solution for last-minute gatherings, cozy family evenings, or simply when you crave something sweet without spending hours in the kitchen.
What Exactly is an Apple Galette? Your Rustic Dessert Solution
The term "galette" is a French word that, in the culinary world, refers to a free-form, rustic tart. Think of it as an unfussy, deconstructed pie. Unlike its high-maintenance cousin, the traditional apple pie, an apple galette requires no special pie pan, no meticulous fluting or crimping of edges, and certainly no wrestling with that notoriously challenging first slice. Instead, the pie crust is simply rolled out, filled with fruit, and then informally folded up around the edges to create a charming, slightly imperfect border. This relaxed approach is not a shortcut to a lesser dessert; it's the very essence of its appeal, resulting in a beautifully rustic appearance that looks far more impressive than the effort it took to create.
The Allure of Simplicity
The beauty of the apple galette lies in its inherent forgiveness. There's no pressure for perfection; in fact, its slightly imperfect, handmade quality is precisely what makes it so appealing. This makes it an incredibly appealing option for:
- Bakers intimidated by pie: If you've shied away from pie making due to its perceived complexity, the galette is your gateway to pastry success.
- Busy individuals: With many recipes requiring minimal chill time (especially with store-bought dough), you can have an apple galette oven-ready in minutes.
- Entertaining: Its rustic elegance makes it a show-stopping dessert that looks sophisticated yet approachable. Serve it warm with a scoop of vanilla ice cream, and watch your guests swoon.
In essence, an apple galette delivers all the flaky, buttery, fruity goodness of an apple pie with half the work and none of the stress. It truly is an easy apple galette that's faster than pie and ready to impress.
Crafting Your Perfect Apple Galette: Key Ingredients Explained
While the process is simple, selecting the right ingredients is key to an outstanding apple galette. Let's break down the stars of the show:
Choosing the Right Apples
The foundation of any great apple dessert is, of course, the apples themselves. You want apples that hold their shape well during baking and offer a good balance of sweetness and tartness. Our top recommendations include:
- Granny Smith: A classic for a reason. Their firm texture and tartness provide a wonderful contrast to the sweet filling and rich crust.
- Golden Delicious: Sweet and mellow, they soften beautifully and complement tarter varieties.
- Honeycrisp, Fuji, or Gala: These are excellent choices if you prefer a sweeter galette or want a variety with a slightly crisper bite even after baking.
Pro Tip: Don't be afraid to use a mixture of two or three different apple varieties! This adds complexity and depth of flavor, creating a more dynamic filling. Whether or not to peel your apples is a matter of personal preference. If you dislike the texture of cooked apple skins, go ahead and peel them. If you're short on time or don't mind the skins, skipping this step is perfectly fine and adds a little extra fiber and rustic appeal.
Spices: The Heart of the Flavor
The aromatic blend of spices is what transforms simple apples into a comforting, irresistible filling. While cinnamon is non-negotiable, consider enhancing your galette with a touch of:
- Nutmeg: Warm and subtly sweet.
- Allspice: A hint of cloves, cinnamon, and nutmeg in one.
- Ginger: Adds a gentle warmth and zest.
Crucial Advice: Always check the freshness of your spices. Older, expired spices lose their potency and can leave your dessert tasting flat. If your spices have been lurking in the back of your pantry for years, it's time to replace them. Fresh spices make an incredible difference to the final flavor profile of your apple galette.
The Crust: Homemade or Store-Bought?
One of the beautiful aspects of the easy apple galette is its flexibility. While a homemade all-butter pie dough yields an undeniably superior flaky, tender crust, a high-quality store-bought refrigerated pie crust or even frozen puff pastry works wonderfully and significantly cuts down on prep time. For the quickest galette possible, a pre-made crust is your best friend. Just ensure it's thawed and pliable before rolling.
Mastering the Galette: Simple Steps for Success
Making an apple galette is less about precision and more about embracing a relaxed, intuitive approach. Here’s how to ensure a perfect bake every time:
Preparing Your Workspace and Dough
- Prep Your Surface: Always roll out your dough on a piece of parchment paper. This prevents sticking and makes transferring the galette to your baking sheet incredibly easy.
- Roll It Out: Whether homemade or store-bought, roll your dough into a rough 12-14 inch circle. Don't worry if it's not perfectly round; remember, rustic is the goal!
Assembling Your Rustic Masterpiece
- Slice the Apples: Slice your apples thinly and uniformly (about ⅛ to ¼ inch thick) to ensure even cooking. A mandoline can be a great tool here, but a sharp knife works just as well.
- Mix the Filling: In a large bowl, toss your sliced apples with sugar (adjust to the sweetness of your apples and preference), your chosen spices, and perhaps a tablespoon of flour or cornstarch to help absorb juices. A squeeze of lemon juice can also brighten the flavors and prevent apples from browning.
- Arrange the Apples: Mound the apple mixture in the center of your rolled-out dough, leaving a 2-inch border all around. You can arrange them in concentric circles or simply pile them artfully. Avoid overfilling, as too many apples can make the crust soggy.
- Fold the Edges: Gently fold the dough border up and over the edges of the apple filling, creating pleats as you go. This forms a natural barrier to hold in the juices.
- The Golden Touch: For a beautiful golden-brown, shiny crust, brush the folded dough with an egg wash (one egg beaten with a tablespoon of water or milk) and sprinkle with a little coarse sugar for extra sparkle and crunch.
Baking and Beyond
Bake your galette in a preheated oven (typically around 375-400°F) until the crust is deeply golden brown and the apple filling is bubbling and tender. This usually takes 40-55 minutes, depending on your oven and apple thickness. Let it cool slightly on the baking sheet before transferring it to a wire rack. This allows the juices to set and prevents the galette from falling apart.
Serving and Storing Your Delicious Creation
The Perfect Pairings
A warm apple galette is delicious on its own, but it truly shines when paired with simple accompaniments:
- Vanilla Ice Cream: A classic for a reason – the cold, creamy ice cream melting over the warm, spiced apples is pure bliss.
- Homemade Caramel Sauce: Drizzle generously for an extra layer of indulgence.
- Whipped Cream: Light and airy, it complements the richness of the galette.
- Candied Nuts: A sprinkle of pecans or walnuts adds delightful crunch and flavor.
Storage and Refreshing
If you happen to have any leftovers (a rare occurrence!), store your apple galette in an airtight container at room temperature for up to 1 day, or in the refrigerator for up to 3 days. To revive its fresh-baked glory, simply pop it into a 300°F oven for 5 to 10 minutes before serving again.
Can You Freeze an Apple Galette? Absolutely!
The apple galette is also incredibly freezer-friendly, making it perfect for meal prep or future dessert cravings. There are two main ways to freeze it:
- Before Baking: Assemble your galette completely, but skip the egg wash. Freeze it on a sheet pan until solid, then transfer it to an airtight container or wrap it tightly in plastic wrap and foil. When ready to bake, transfer the frozen galette to a parchment-lined baking sheet, brush with egg wash, and bake from frozen, adding about 10-15 extra minutes to the baking time, or until golden and bubbling.
- After Baking: Allow your baked galette to cool completely. Wrap it tightly in plastic wrap, then in foil. Freeze for up to 2-3 months. To serve, thaw overnight in the refrigerator, then refresh in a 300°F oven for 15-20 minutes until warmed through.
The easy apple galette proves that baking doesn't have to be daunting to be delicious. With its forgiving nature, minimal equipment requirements, and incredible flavor, it's a dessert that will undoubtedly earn a permanent spot in your recipe rotation. So, ditch the pie pan, embrace the rustic charm, and get ready to enjoy one of the simplest, most satisfying apple desserts you'll ever make. Happy baking!
